Monday, March 12, 2012

Beginner's Guide to Custom Challenges using Waterine's ClgEditor


This tutorial will cover the very basics of using Waterine's ClgEditor tool to create your own combo challenges for SSF4AE. For this, we will need the ClgEditor and Dantarion et al's Ono! Editor.

When you first run the ClgEditor, click the button to 'Open...' and browse to your installation directory (usually C:\Program Files (x86)\Steam\steamapps\common\super street fighter iv - arcade edition), then go to ...\resource\battle\chara and go into the folder for the character whose Trial Mode you wish to modify. It should filter the folder contents such that the only file displayed is our desired CLG file, in my case, CMY.clg.


Once the file is loaded, you can see the list of challenge levels on the left. At the top of the window you should see a pulldown menu labeled 'Ultra Selection,' which lets you select which Ultra combo should be loaded for the challenge, and another pulldown labeled 'Target State,' which determines how the dummy (Dan) should act (for use with situational combos, like ones that must start with a counterhit or only work on jumping opponents).

The area underneath those pulldowns is where most of the fun happens.

In the 'Scripts' section, the first button from the left (looks like a sun) creates a new command, either an 'attack' or a 'script,' which you can choose between using the 'Criteria type' pulldown menu to the right. Attacks are just your normal actions while scripts are movement actions, like dashes and FADCs.

The 'Criteria indices' field tells the game which moves it should accept as a successful command. If any strength of a move will do, as is the case with many of the early challenges, you must include each index that fulfills the criteria. For a regular special move (light, medium, hard and EX), you would need entries for all four strengths.

Back in the scripts window, each command represents one discreet portion of a challenge, and you can show up to 8 on the screen. You can go beyond 8 in the list, but unfortunately the display doesn't scroll in-game, so the player won't be able to see the rest.

To the right, you can choose what on-screen instructions and input help to display from the respective pulldown menus.

So, lets say I want to change Cammy's first challenge from a simple Spiral Arrow to a Cannon Spike > FADC > EX Cannon Spike.

Step 1. Select the first trial from the levels list and hit the 'X' button under Scripts to delete the existing command. Then, click the sun button to create a new command. Our first command--Cannon Spike--is an attack, so choose that from the Criteria type pulldown.

Step 2. Next, we need to fill in the Criteria indices field with the indices for the move (I cheated and stole them from Challenge #3), in this case, 100, 101, 102, 103, 104, 105.

Step 3. Under 'On-screen command text's last pulldown menu, we want to select Cannon Spike, and under 'Help menu command text's last pulldown menu, we want to select Cannon Spike Input.

Great! There's our first command. Now, we need to make another.

Step 4. Click on the sun button again, but this time we're going to use a movement script, so select 'Script' from the Criteria type pulldown.

As in step 2, fill in the Criteria indices field with the appropriate inputs, in this case 325 (I stole that from a later challenge, as well; are you seeing a pattern here?).

Likewise, we'll fill in the On-screen command text and Help menu command text, which are a little weird for FADCs: in the first pulldown under On-screen commant text, choose 'EX,' and under the third pulldown, choose 'FocusCancel.' Then, under Help menu's first pulldown, choose 'EX' again, and under the third, choose 'MP+MK.'

Step 5. Alright, moving right along, click the sun button one more time and choose the 'Attack' criteria. Up until now, all of the moves we've wanted to use could be easily pilfered from other challenges. However, no challenge requires an EX Cannon Spike specifically, so we'll have to figure this one out on our own. To do it, open up the Ono! Editor and open Cammy's BCM file. You should see a window that looks something like this:
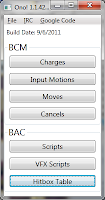
Click on the bottom button, labeled "Hitbox Table." It should open a new window that looks something like this:
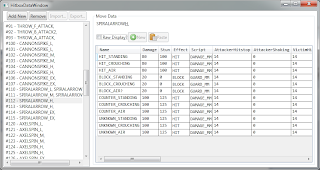


There's a lot of really great information available in this window, but we really only need the numbers on the far left in front of the move names. So, scroll down until you find your desired move, in my case EX Cannon Spike, which is listed under #106 and #107. If the criteria type is an attack, you use the hitbox data number, if it's a script, you should use the script number (you can expand the header info in Ono! to see it).

Now, enter those numbers into the Criteria indices field, separated by commas and spaces as necessary.

Fill in the appropriate on-screen command and help menu text, and you should be all set. Click the save button and lets go check it out by copying it into our ...\resource\battle\chara\CMY folder (don't forget to make a backup!!).
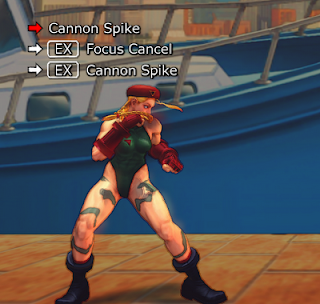


Now, as a note, you can make your combos against any version of the characters' movesets you like (Super is the default, of course, but you can use movesets from AE, 2012 or even custom movesets created in Ono!), you just have to copy the appropriate BAC/BCM files into the ...\resource\battle\chara\*** folder to overwrite the ones that are already there.

If you create something cool, be sure to share your work with the community, and always always always make backups!

Saturday, March 3, 2012

xBR vs HQx Interpolation Filter Comparison

UPDATE: the comparisons in this post aren't a true representation of hq2x (more info in this post). The xBR shots are still valid, but don't put much weight on the comparisons without reading the other post for context.

This post compares the popular HQx interpolation algorithm with the newer xBR, which has been covered in some of my other posts. If you just want to download the filters, you can get them from the link at the bottom of the post.

Since Maxim Stepin created the HQx interpolation algorithm more than a decade ago, it has been the favored real-time interpolation filter for the emulation scene. The way it works is it looks at each pixel and then compares its color to that of the 8 surrounding adjacent pixels. If it finds a match, the filter then compares the resulting pattern with a predefined lookup table to guess what the original pattern was trying to represent.

For example, if we take a pattern like this:


and scale it up via nearest neighbor--that is, a straight upscale with no interpolation--you end up with this checkerboard pattern:

But, if you use HQ2x, you end up with this:

The algorithm guesses that the original pattern was trying to represent a diagonal line rather than a checkerboard pattern, so it fills in the gaps to compensate.

Recently, a Brazilian programmer by the name of Hyllian (aka Jararaca) developed a new algorithm that actually improves on HQx, known as xBR (stands for "a filter that scales By Rules").

xBR works much the same way as HQx insofar as it is based on pattern recognition, and it would upscale the above pattern with the same result. However, it goes further than HQx by using a 2-stage set of interpolation rules, which better handle more complex patterns such as antialiased lines and curves. The two main points that can be fine-tuned are the formula used to measure the distance between colors and the way the algorithm treats corners (more on the corners later).

Hyllian began development of xBR in 2011 as a plugin for Steve Snake's Genesis/Mega Drive emulator, Kega Fusion.

You can read more about Hyllian's algorithm here.

Lets take a look at how they compare on a real-world example (HQ2x on the left, 2xBR on the right; click to embiggen):


As you can see, 2xBR does a much better job on smoothing curves without getting chunky (see Yoshi's nose and the dragon coin). It also does a better job on the 'eyes' of the block, which is represented as a diagonal line with 2xBR compared with the series-of-squares look with HQ2x.

Here's another comparison, using Earthworm Jim's title screen:


And here's a third comparison, using the title screen to Earthworm Jim 2:


HQ2x actually does a slightly better job at getting a smooth gradient around the highlight in Jim's eye, but the rest of the image is a mess. xBR has smoother, straighter lines at every color transition.

Additionally, the xBR algorithm scales to higher scale factors much more easily than the HQx algorithm, making 3-, 4-, 5- and higher versions faster and more effective.

At very high scale factors (5 and higher), the xBR algorithm can obliterate some small details, such as pupils in eyes, dots, and so on, so Hyllian introduced some additional calculation to compensate (5xBR-v3.5a on the left [uncompensated] vs 5xBR-v3.5b on the right [compensated]):


Of course, this compensation comes with its own drawbacks and false-positives, so which version works better varies on a game-by-game basis.

UPDATE: Hyllian has made a third variant that is even more cautious. Here's an animated GIF comparing the way each variant handles text:
Another interesting aspect of this algorithm is that it works very effectively on images already upscaled with xBR, so you can easily get absurdly large images (scaled 1x, 3x, 9x and 27x) with just a few iterations:
This puts it in direct and favorable competition with this vectorization method that recently made the rounds. xBR manages to maintain detail a bit better than the vectorizer, and it can actually operate in real-time, unlike the vectorizer.

You can download these shaders from my Mediafire repo (most are available in either XML/GLSL or Cg format, both of which are compatible with SSNES). UPDATE: KrossX ported 2xBR-v3.5a to ePSXe format and SimoneT ported 5xBR-v3.5a.

UPDATE: New Cg version of 5x variant. Runs approx. 25% faster. :)
UPDATE: new XML versions of 5xBR-v3.7. This package includes 3 variants (a, b and c), as well as the A-variant+scanlines.

UPDATE: Hyllian has been working on a new version that analyzes an image frame by frame and dynamically decides whether to apply xBR smoothing or Reverse-Anti-aliasing to produce the best picture. It handles text better than any filter/shader I've encountered, and it also excels at digitized, prerendered images and backgrounds. Here's a shot of it with Final Fantasy VI on GBA:

You can download this shader here.

UPDATE (4/19/2013): Another great update from Hyllian, this time adding 3 levels of analysis. This version runs a bit slower in my experience (unsurprisingly), but it now handles jagged edges that earlier versions simply couldn't detect, due to their 2-level analysis pattern. Compare this shot with the ones at the top of the post:
Notice that inclined bit of ground under the dragon/yoshi coin. This new version will also really help with Mega Man X games, which tended to have a lot of these sorts of gently sloping planes. You can download a Cg shader of this new version here, or a 3x scale Kega Fusion plugin here.

Closely related to xBR are the SABR shader by Joshua Street and Zenju's xBRZ CPU filter. SABR was written by Mr. Street as part of a school project and it differs from xBR in a couple of ways, including using antialiasing on edges. It was forked from Hyllian's 5xBR v3.7c shader. xBRZ is a rewrite of the xBR algorithm in C++, with some changes to the corner detection and color distance measurement. It was forked around xBR v3.5.

There is also a standalone library written in C that incorporates both the xBR algorithm (as it appears in FFmpeg's libavfilter) and Hqx. You can browse this project's source on github.

Analytics Tracking Footer