Monday, December 31, 2012

Fix for TV Overscan in Ubuntu with Nvidia Drivers

Ok, this problem has been a consistent thorn in my side for as long as I've been running Ubuntu on my TV (a number of years). On a lot of HDTVs, setting your computer to display 1080p or 720p or whatever will often cut off the edges of the screen. This cutoff is known as overscan and it used to be necessary because all sorts of garbage data would be displayed in the edges of broadcast signals and video games. Nowadays, that doesn't happen and we want to see every bit of the picture but many TVs still do it.

The easiest fix on TVs of any reasonable quality is to set the TV to "just scan" or "pixel perfect" mode (it goes by many different names depending on manufacturer). However, if your TV is cheap/crappy, you won't have such an option and the only way to deal with it is via software. This works just dandy in Windows, where the Nvidia driver has a handy little "overscan compensation" option where you can adjust a slider until your entire desktop is visible.

Sometimes, depending on driver revision and apparently some other unknown (to me) factors, a similar slider is available in the nvidia-settings applications in Ubuntu. This is undependable, though, and it will sometimes be grayed out or even disappear after you've used it in the past! :O

If you run into any of this, the way to fix it is to add a line to your /etc/X11/xorg.conf files that invokes the ViewPortIn/ViewPortOut options in the driver. So, open a terminal and type:
sudo nano /etc/X11/xorg.conf
You should see:
Section "Device"        Identifier    "Default Device"        Option        "NoLogo"       "True"EndSection
Or something similar. If you don't see any of that (e.g., if your file is totally empty), then just add it in manually.

Next, add a new line under the "NoLogo" line that looks like this (all one line, btw):
Option    "metamodes" "DFP-0: idealxresolution { ViewPortIn=idealxresolution,ViewPortOut=desiredxresolution+excessX+excessY }"
So, if, like me, you want it to run in 720p with 24 pixels of horizontal overscan compensation added to left/right sides and 14 pixels of vertical overscan compensation added to top/bottom, your line will look like this:
Option "metamodes" "DFP-1: 1280x720 { ViewPortIn=1280x720,ViewPortOut=1232x692+24+14 }"
Now, you'll notice that the buffers I've added to the end are exactly half of the total amount of resolution I'm chopping off. That's because the specified amount is added to both sides.

You'll also notice that my line uses DFP-1 instead of DFP-0. I'm not sure why that is, but that's what it identifies as in my nvidia-settings application, so be sure to check there first to find out what yours should be labeled as.

Log out and back in and it should use the new resolution. If not, try rebooting.

Wednesday, October 31, 2012

Fix for Win8 Unhandled Error -1 (SSF4)

Ugh, this problem was infuriating. I got a cheap copy of Windows 8 through my job and decided to go ahead and install it, just to be up-to-date. Then, I went to play SSF4AE via Steam and instead of launching, I got an ugly little window that said "An unhandled error has occurred -1."

After digging around online, it appears that the fault lies in Windows 8's default implementation of Games For Windows Live. |:-[

To get around this problem, we need to uninstall the default GFWL and download the latest installer from Microsoft.

You DO NOT have to uninstall/reinstall Steam as is suggested elsewhere online. If you try that, be aware that it will may uninstall all of your games at the same time (thanks to MasterPhW for the correction). It's supposed to ask before doing so, but it didn't ask me, so YMMV.

Thursday, September 13, 2012

Background Shader for RetroArch

UPDATE (9/18/2012): It turns out the Themaister already wrote a waaay better version of this shader that can do some cool things like move the location of the game window and scale to arbitrary scale factors (i.e., not just even integers). I also made another old TV background:
If you'd like to try Themaister's version of the shader--which I've provided as-is, as well as combined with flat and curved CRT shaders--you can download it and the above TV background here:
http://www.mediafire.com/?av2y788pn3v1b3e

UPDATE (9/26/2012): Another one by request, using Super Metroid's Japanese artwork:
Download:


Original Post:

I've been working on a fun little pixel shader for use with RetroArch that functions similarly to the Cg border shader but using GLSL and the XML shader format. The way it works is that it combines the functionality of the existing integer scale shader with a lookup texture (LUT) that loads an external texture and then combines that image with the rendered game image. The LUT then has a transparent window in the middle where you can see the game peeking through.

In the simplest application, you can put whatever fancy stuff you want around the game window, like this awesome pixel-art border created by FirebrandX (NOTE: all of these look better in actual use; the way I took the screenshots caused the game's vertical resolution to get cut off by the border a bit):

By using RetroArch's awesome multipass shader support, you can also tack on some fun effects, like cgwg's CRT shader and some high-resolution artwork:

We can also do fun stuff like this TV border:


And we can use the transparency of the background image to overlay things across the game, like this Super Mario Bros 2 border, which has the characters overlapping a bit:

You can download these and others here:

To use the shader, you'll need to uncheck the 'Lock Aspect Ratio' option in RetroArch, under 'Video' and put the desired background image in the same folder as the shader with filename 'background.png.' The backgrounds only work with specific monitor resolutions, so I've included 1080p versions of the ones pictured above, while FirebrandX was kind enough to make several iterations of his sweet pixel-art backgrounds that work at their specified resolutions. I've also included several background-compatible shaders, including the raw shader, ones with cgwg's CRT+NTSC-RGB (both flat and curved varieties) and some with cgwg's CRT+NTSC-RF (both flat and curved varieties).

In case you'd like to make your own, I've also included a simple template (in PSD format) for 1080p resolutions.

Saturday, September 8, 2012

Ubuntu Quantal Beta - First Impressions on x120e

I just updated to the latest beta release of Ubuntu, codenamed Quantal Quetzel (or, as I call it, Quantum Pretzel), on my Lenovo x120e netbook.

Installation went smoothly and my optional broadcom wireless chipset was detected and enabled automatically during installation. This is the first time that has loaded without any hassle on my part, and I'm very pleased with the result. Users with the default atheros chipset have been enjoying this ease of installation for several releases already.

Installation went smoothly, now that they've squashed a particularly nasty bug in the installer that would crash if you tried to manually modify the partition table...

Once I booted into the actual installed system, it defaulted to use the open source driver for my integrated Radeon Fusion chipset, which provides adequate acceleration for transparency and other desktop composition goodies. Speaking of, the default Unity interface seems to have been improved further beyond the already much-improved Precise release, with the icons in the dock being smaller and less cartoony on my machine, with transparent backgrounds rather than the garish multicolored backgrounds from before (YMMV).

Virtual desktop switching also seems much improved. I never used it before because it felt clunky and laggy, but now transitions are smooth and dragging windows among desktops is effortless and intuitive. However, sometimes the windowing system gets confused and tries to maximize things inappropriately, leaving a transparent orange overlay on the screen--to show where it's trying to maximize--until you click on the window decoration and let it do its thing, then resize.

Suspend works well on this machine, faster than before and with quicker wakeups, and the wireless reconnects faster after suspend, as well. There doesn't seem to be a hibernate option anymore, so I couldn't test that.

One problem I ran into: I previously used my /etc/fstab to mount a shared folder from my network at startup via smbfs, but that package has been removed upstream, so now I use cifs as the filesystem and that seems to work just fine.

If you have any questions or anything you'd like me to test, feel free to hit me up in the comments.

Saturday, August 4, 2012

Netflix Channel Installation Error on Softmodded Wii

The Netflix channel on my Wii finally stopped letting me skip the nag screen and demanded that I update. So, I deleted the old Netflix channel from Wii's the built-in channel management menu and attempted to download the new version from the Shop Channel.

I was greeted with an error 204036 and given the option to try again, which gave the same results each time.

So, I tried to just download a copy of the channel wad (Netflix Channel v1024 USA) to install through a wad manager. This didn't work, either, as it kept giving me error -1022 (Content did not match hash in TMD).

I tried using a bunch of different IOSes to install, but nothing worked, though I ended up finding a solution:

Step 1. Go download a copy of the old Netflix Channel wad (NetflixChannel-v1-USA) and reinstall it via a wad manager.

Step 2. Once it's installed successfully, use the wad manager to uninstall it. (I got an error during uninstallation, but it finished okay anyway, FYI)

Step 3. Install the new Netflix Channel wad and it should complete successfully this time.

Apparently, the Wii's normal channel removal tool leaves behind some garbage that stops the new channel from installing properly. By reinstalling the old version and then uninstalling it through the wad manager, we can get rid of that garbage and end up with a clean slate.

Update: If this doesn't work for you right away, you may have to install IOS 56 and/or the Shop Channel v20 first. In my case, I'm still on a much older shop channel, but someone in the comments mentioned needing to do this before it would work.

Update2: It's asking for another update... If you follow the steps above, then uninstall Netflix via a wad manager, you should be able to download the updated Netflix channel from the Shop Channel.

Saturday, July 28, 2012

Customizing cgwg's CRT Pixel Shader

This document identifies some of the user-configurable options available in cgwg's GLSL CRT shader and provides some screenshots to explain their effects.

For individuals interested in recapturing the look of retro gaming consoles played on a CRT television like the ones we grew up with, cgwg's CRT shader provides the closest approximation available for modern LCD displays. The pixel shader is purely cosmetic--nothing could impart the technical advantages of a CRT, such as negligible input lag and insanely high contrast, to an LCD--but it can go a long way to displaying old games as we remember them. Since memory and nostalgia are important to the way we perceive these games, each person will have different feelings about what looks "right" to them.

We will be using the latest (as of the time of this writing, 7/28/12) and most complete version of the shader, known as CRT-Geom. This shader allows for simulated screen curvature, rounded corners, simulation of a back-tilted screen (for arcade emulation) and many other goodies. All images are captured at 4x scale, click the thumbnails to embiggen.

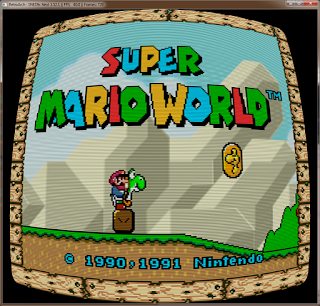
This is what the shader looks like with all default parameters, also known as the 'curved' variant (cgwg chose sane values for all of the variables by default):
The user-configurable parameters are primarily located in two places in the shader, starting at line 87 for the first section and line 135 for the second section. You should be able to open and edit the shader in any text editor, but I recommend Notepad++.

The first parameters, 'gamma of simulated CRT' and 'gamma of display monitor' allow the shader to determine how much gamma correction to apply to the image. CRT displays generally had higher gamma ratings than most LCD displays (2.4 for a typical CRT vs 2.2 for a typical LCD), so the shader adds 0.2 to the gamma to compensate. If you calibrate your LCD to a higher or lower gamma setting, you may wish to change the 'gamma of display monitor' to reflect your individual settings. You can also raise or lower the simulated gamma to make a darker, more saturated look:
or a lighter, desaturated look:


Next, we have 'overscan.' Each CRT showed a slightly different amount of the picture, and the cut-off portion was referred to as overscan. You can modify the amount of over- or underscan by changing this variable. Setting it to (0.00,0.00) will assume you want the picture aligned exactly with the borders of the window. Setting it to a value greater than 1.0 (for example, 1.10,1.10) will cut off a large portion of the screen (approximately 10% in this example):
while setting it to a value less than 1.0 will surround the screen with black bars (i.e., underscan):

Increasing the overscan slightly, say, to 1.02,1.02, can cut off unsightly garbage lines at the top of the screen, which is common on NES games.

Next, we have 'aspect ratio,' which controls how much our screen curvature settings will affect the top/bottom and sides of the image. The default setting of 1.0, 0.75 means the curvature will be more pronounced on the top/bottom than on the sides, to compensate for the standard 4:3 aspect ratio. Setting it to 1.0, 1.0 will make the settings affect both sides of the screen equally, which isn't quite right in that the top/bottom actually appears more curved than the sides:
 If for some reason you want only the sides straight, you can set it to 1.0, 0.5:

or 0.5, 1.0 to make only the top/bottom straight:


Next up, we have 'simulated distance from viewer to monitor.' Similar to the 'aspect ratio' setting, this exaggerates the effect of the 'tilt angle' setting that we'll be covering in just a moment. The default value of 2.0 is reasonable. Increasing the value reduces the effect of the tilt angle:
while lower values magnify it:


Next, we have 'radius of curvature,' which determines how curved our simulated TV tube will be. Setting the value to 2.0 reduces the curvature to something more like what I remember.

'Tilt angle' pincushions one side of the screen. To tilt the screen back, use a negative value for the second number. The default for the 'arcade tilt' variant, (0.0,-0.15), is a sane value:
while increasing the second value tilts it back further, which can be disorienting:


After that, we come to 'cornersize,' which determines the radius of the corner arc. I think a setting of 0.03, as used in the default image, looks appropriate. Increasing the value to 0.10 makes for some silly, super-round corners:
while a value of 0.001 makes for super-pointy corners:


For the last parameter in this section, we have 'cornersmooth,' which determines how sharp (sharp as in sharp/blur, not as in pointy) the corners look. The default value is 1000.0, which looks fine, but I noticed that if you set the value insanely low (i.e., 80), you get a little vignetting around the edges, which reminds me of my crummy old TVs:
On to the next set of parameters.

The second set of options are either enabled or disabled by using 'comments,' which in this case are represented as a double-slash, like this //.

The first option is 'linear processing,' which calculates the interpolation in linear gamma:
The effect is subtle (black outlines will be thinner), but disabling it via commenting it out (//#define LINEAR_PROCESSING) can improve the framerate with some video cards.

Next, we have 'Enable screen curvature.' Pretty self-explanatory, but if you comment this line out, you'll get straight top/bottom/sides of the screen, but with the corner arcs intact (barely visible in this shot):
By commenting this out and setting 'cornersize' to 0.0, you get an idealized flat CRT tube, which is represented by the 'CRT-flat' shader variant:

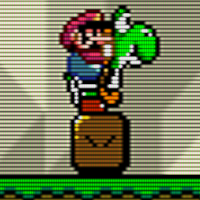
The next two options work together (that is, if you uncomment one, you should comment the other). By default, the shader uses 3x oversampling of the beam profile, which makes brighter pixels bleed further into the surrounding scanlines. Here it is with the default oversampling, scaled up 400% (look closely; it's most obvious on the bright red of Mario's sleeve):

and here it is with the gaussian beam profile:
The gaussian beam profile may have better performance on some video cards.

Those are all of the options available for the standard CRT shader, but there are a few more things we can add in. The first of which is support for interlaced video. Some games did a sort of fake doubling of their vertical resolution by showing different lines of a progressive signal on alternating frames in a process known as interlacing. If handled incorrectly, you will see a ton of combing artifacts (weird horizontal lines on moving objects), as well as distorted scanlines (first image taken using this older, non-interlace-supported version):


These pictures unfortunately cannot show the jutter in the lower image that occurs from showing different lines on each alternating frame.

Next, we have support for pseudo-hires transparency--whereby games created a fake transparency effect by doubling the horizontal resolution to 512 and then covering the transparent area with thin vertical lines, which were then squished together and blurred when the CRT displayed the image--in the games that utilize it, including Jurassic Park and Kirby's Dreamland 3:

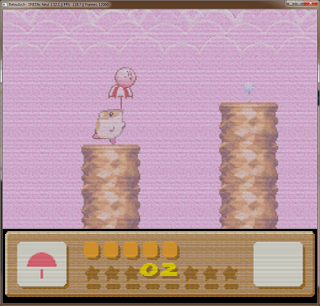
This blurring is accomplished by adding another pass to the shader that does nothing but squish the horizontal resolution from 512 to 256. Note: this variant is multipass and therefore incompatible with the official bsnes/higan GUI. Retroarch can use it just fine with bsnes-derived emulation cores, but it is incompatible with FBO/2-pass shader stacking.

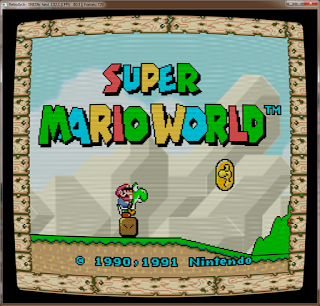
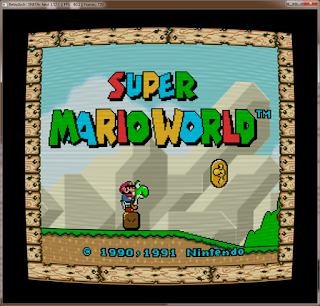
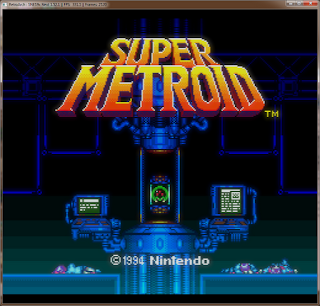
Finally, to simulate the natural phosphor glow of a CRT display, cgwg created a multipass version of his CRT shader that includes a "halation" pass, which provides a soft blur that is most noticeable against a black background, such as the Nintendo logo screen in Super Mario World (it also seems to be doing some aspect ratio correction, though I'm unsure if that's intentional):
Here's a shot of Super Metroid's title screen without and with halation, respectively:

Note: Like the TV blur variant, this halation variant is multipass and thus incompatible with the official bsnes/higan GUI. It works fine with Retroarch but is incompatible with the FBO/2-pass feature.

Now, beyond the CRT display, our childhood gaming experiences were also colored by limitations of the NTSC signal standard and the lossy, analog hookups we used to connect our consoles. To capture these effects, we turn to blargg's NTSC filter, which runs on the CPU rather than the GPU and can thus be combined with our CRT shader.

The NTSC filter is available in these CPU filter packs (compatible with RetroArch but not bsnes/higan):
Win32
Win64
Linux 32-bit
Linux 64-bit
Mac OS X

The least intrusive variant of the filter is the RGB preset, which simulates a high-quality RGB connection. This variant provides NTSC color gamut correction but leaves the signal otherwise untouched:
Next, we have the S-video variant, which has color correction and some fringing, but is still relatively high-quality. This is the variant I use most of the time:
The third variant, composite, brings in a lot of signal noise and color bleed, just as you would get through a composite, RCA-cable connection:
The worst-quality variant is RF, which looks just as messy as the composite signal, but with added jutter every other frame, just like when using the RF adapter bundled with classic consoles:
One thing to be aware of, though, when using any variant of the NTSC filter is that it also does some gamma correction, which can be overwhelming to some people when combined with the CRT shader. To mitigate this effect, you can modify the CRT shader's 'gamma of simulated CRT' to match the 'gamma of display monitor' value to disable the shader's own gamma correction (shown here with the S-video variant):

My personal preferences, depending on the game/system: 'radius of curvature' of 2.0, cornersize of 0.03, cornersmooth of 80.0 and NTSC-Svideo. Sometimes I'll use the flat variant (especially on displays that have problems with moire patterns caused by curvature+scanlines), and I often use the halation variant when I'm on a machine with sufficient resources. I always use interlacing support, which has been incorporated into all of the latest versions, and TV blur when possible (i.e., when using Retroarch rather than the official bsnes/higan GUI).

Sunday, July 15, 2012

SFxT: How to Duplicate A Character - Proof of Concept

There are a lot of reasons why you might want to duplicate a character in SFxT, the most obvious (to me) being that you would like to play a team that consists of 2 copies of a single character that you are most skilled with. To accomplish this task, we need to edit a few files and make copies and rename a bunch of others, so lets get some tools together first.

As usual, you'll need piecemontee's Asset Explorer (aka SF4Viewer) and a text editor (I recommend Notepad++; regular Notepad WILL NOT WORK). You'll also probably want a bulk renaming utility, such as the aptly named Bulk Rename Utility. You should also take this opportunity to make backups of any files we plan to edit, as mistakes can render your game unplayable. Repeat: MAKE BACKUPS BEFORE TRYING ANY OF THIS.

NOTE: this is currently a proof of concept. The duplicate character will only work in training mode unless we duplicate more files, which I'll add to the post if/when I track them all down. Fights with intro animations will crash. See the bottom of the post for Robhal's update! Also, duplicating characters will corrupt your save data, so be sure to back that up first.

STEP 1 - Creating our duplicate

The first step to duplicating a character is to make a copy of the target's character folder. For this tutorial, I'll be using Ken as an example. So, navigate to [install dir]\resource\CMN\battle\chara, right-click on the desired character folder, select copy, then right-click elsewhere in the directory and choose 'paste.' You should end up with a folder named '*** - copy.'


Next, rename that folder to a non-conflicting 3-letter prefix that will represent your new character duplicate. In my case, I'm going to use 'KE2.' Note: you must use exactly 3 letters for your prefix or the game will fail to even load.

Once that's done, navigate into your new folder and open your bulk renaming utility. Select all of your files in the folder and rename all of them to match your 3-letter prefix (that is, all of the KEN* files should be renamed to KE2*), then do the same for all of the files in the 'sound' folder (these steps will be different depending on which renaming utility you use, so I'm not going to go over it here).

It should end up looking like this:


Now, we'll need to make duplicate call sounds (*_CAL_*) for each character we expect to partner our duplicate with. For the sake of simplicity, I'm only going to partner KE2 with regular ol' KEN, but if you wanted to be able to partner him/her with any other character, you would need to make calls in each potential partner's 'sound' directory. So, navigate to his folder, go into 'sound' and then make a copy of his *_CAL_KEN_E and ...J files. Rename them to match your duplicate prefex, like this:


Note: Failure to create the proper calls in each partner's sound folder will result in a game crash. (It's interesting that Capcom has these duplicate calls in the first place, suggesting that single-character teams were a possibility at some point).

Ok, with that done, we're ready to move on to step 2.

STEP 2 - Telling the game about our duplicate

SFxT keeps track of the available characters and what to think about them in the const.lua file, located in the [install dir]\resource\CMN\boot\game directory. Make a copy of the file and move it to a directory where you have write permissions, such as your desktop.

Then, open the file in your text editor and you should see a section labeled "charas" at the top of the file. Navigate down to the subsection for your duplicated character (in my case, Ken) and copy everything from his/her subsection, starting with the open-curly-braces (this thing: { ) and ending with close-curly-braces-followed-by-a-comma (this part: }, ).


Now, paste that in (right after the original is fine) and change the first line, labeled "['code']" to your duplicate's code (in my case, KE2). You can change the name here, too, but I don't think it really matters. While we're here, you can also modify anything else you want, such as vitality, "official partner," default voice, etc.

Save the file and replace the original (make a backup first, if you haven't already). Now we're ready for step 3.

STEP 3 - Creating a character select slot

SFxT determines which character slots are available through the selector_layout.emz file, located in the [install dir]\resource\CMN\ui\pre_battle directory. However, if you try to open the file directly, you'll see just a bunch of gibberish because the file is compressed. To decompress it, just open piecemontee's Asset Explorer and drag the file into the left-hand window pane. It will automatically create a backup of the original file (called selector_layout.emz.compressed) in the same directory, which is convenient. Once that is done, open the now-decompressed file in your text editor and it should look something like this:


This grid represents the character select icon grid, and we can use this file to move characters around (in case you want your favorite character to be closer to the top, for instance) or create new slots altogether by overwriting blanks (#BL). You can also remove characters by replacing them with blanks.

As you can see in the above pic, I have already replaced one of the blanks with my duplicated character abbreviation, to the left of the Random Select box. Note: Make sure you place it somewhere adjacent to an existing character or else you won't be able to move the cursor to it (i.e., the far corners are not good spots).

Once you're finished making changes, save the file and replace the original, making sure to back it up first, if you haven't already.

Now we're ready to launch our game. If all goes well, you should see a new character select slot on the character select screen (to the left of the Random box, just as we stipulated in our text file), which is treated as an entirely new character as far as double-picking is concerned:


Some Current Unknowns

First, I don't know how the game determines which character portrait goes into the character select screen, which is why our dupe has a blank box. Second, I don't know why the duped character is positioned strangely when you select him/her (my KE2 always appears hanging off the screen if I select him first for some reason).

If you figure out anything cool, please leave a comment.

Have fun, share your work and ALWAYS MAKE BACKUPS.

UPDATE - Robhal figured out the missing files to make the duplicated characters usable in vs. and story modes:

And now these my instructions below are continuation from hunterk's method above, to be able to play the duplicated character in Arcade and Versus mode.
1. Go to folder "\Street Fighter X Tekken\stream\CMN\battle\chara", right-click on the desired character folder, select copy, then right-click elsewhere in the directory and choose 'paste.' You should end up with a folder named '*** - copy.' Next, rename that folder to a non-conflicting 3-letter prefix that will represent your new character duplicate. In this case, 'KE2'. Then navigate into the new folder and rename all the files (just two files) to match your 3-letter prefix (that is, all of the KEN* files should be renamed to KE2*).

2. Go to folder "\Street Fighter X Tekken\resource\CMN\ui\battle\comment\cmt", copy the desired character file (in here, KEN.cmt) and rename it to 'KE2.cmt'. OPTIONAL: You may also move the file 'KE2.cmt' to folder "\Street Fighter X Tekken\patch\CMN\ui\battle\comment\cmt" for easier maintenance.

3. Go to folder "\Street Fighter X Tekken\resource\ENG\ui\battle\comment", copy the desired character file (in here, KEN.m4s) and rename it to 'KE2.m4s'. OPTIONAL: You may also move the file 'KE2.m4s' to folder "\Street Fighter X Tekken\patch\ENG\ui\battle\comment" for easier maintenance.

4.Go to folder "\Street Fighter X Tekken\resource\ENG\ui\battle\subtitle", copy the desired character file (in here, KEN.m4s) and rename it to 'KE2.m4s'. OPTIONAL: You may also move the file 'KE2.m4s' to folder "\Street Fighter X Tekken\patch\ENG\ui\battle\subtitle" for easier maintenance.

SOME ISSUE TO NOTICED:
1. In any battle, when the duplicated character use the Cross Rush (ABC Launcher), he/she still has that zoom-in camera animation.
2. In battle with intro, the duplicated character has a weird subtitle. And in the winning screen, the duplicated character has a blank comment.
3. You can't view the quickcombo preview, the trial, and the command list of the duplicated character, otherwise it will fall back to title screen.
4. When you play the Arcade mode, make sure you pick the duplicated character as 2nd character (tag partner). The reason is if you pick the duplicated character as 1st character and when you defeat the final boss (either Akuma or Ogre), after the credit screen, it will fall back to title screen. --> (I haven't found the solution to this issue yet)

Saturday, June 2, 2012

Diablo 3 Mac Installation and Unsupported Video Fixes

I got my hands on an old iMac the other day and decided to install some games on it. So, I downloaded the Diablo 3 installer and tried to run it, but it just bounced in the dock for a while and then disappeared :(

The first thing I tried was to right-click on the installer and select 'Show Package Contents.' Then, under 'Contents' > 'MacOS,' you'll find the Diablo III Setup executable. Double-click it and you should see a Terminal window pop up and quickly disappear. You may not be able to see what has caused the problem, but it should have reported a permissions error ('Permission denied').

To fix this, open a Terminal window and navigate to the directory where you put your installer (for me it was Downloads; the easy way to get to it is to type 'cd ' [that's the letter c, the letter d and a space] and then drop the desired folder onto the Terminal window and hit 'enter') and type (include the quotes here):
sudo chmod -R 777 "Diablo III Setup.app"
It will ask for your password and, once authenticated, it should fix your permissions issue.

At this point, you can try double-clicking on the installer and you should be in business.

If, however, it tells you that your video card is not supported (like me), you will have to do a little more work. No biggie.

Open a terminal and type:
nano ~/Library/"Application Support"/Blizzard/"Diablo III"/D3Prefs.txt
You should see a bunch of options, followed by values, like this:
Scroll down until you see the option 'DisableTrilinearFiltering' and change its value from '0' to '1,' then do the same thing for the option 'HardwareClass.'

It may not be required for everyone, but I also had to add an option, 'DisplayModeWindowMode,' with a value of "1."

Now, save and close by hitting Ctrl+x and then 'enter.'

You should be good to go :)

And, I assure you, performance *will not* be a problem (this is meant as a joke; of course performance will be a problem; it hardly runs, ffs).

Friday, May 11, 2012

Beginner's Guide to Custom Colors in SFxT


Update: The steps from this tutorial have been automated. You can now do all of it easily from sloth86's EMMEdit tool.

Street Fighter x Tekken handles colors in a completely different way from Street Fighter 4 and its derivatives as a result of the color customization feature. Instead of just pulling colors and textures directly from the texture image, the textures look like this:
and the game calculates the appropriate color based on a series of numbers, which represent a color mix from the texture image's color channels. These numbers are stored in the *.obj.emm files--specifically the 'MatCol' attributes--alongside the various other object materials and material attributes.

There are two main ways to edit *.obj.emm files, manually via hex or using NanjouJ's MatEdit tool, which is a little more user-friendly than fiddling with hex codes. In this tutorial, we'll be using MatEdit to copy colors from another color file, rather than calculating the color from scratch. If you would like to calculate an entirely new color from scratch, this post from yajirobe does a good job of explaining it.

So, first thing, we need to make backups of any of the files we plan to mess with. Once you've done that, go download MatEdit from the AE wiki's 'tools' page and identify which files you want to work with. I'm going to be copying a color from one of Ryu's *.obj.emm files into one of Poison's.

Now, create a new folder (on your desktop or wherever) and copy matedit.exe and both Ryu and Poison's *.obj.emm files into it. Then, hold ctrl+shift on your keyboard and right-click somewhere inside that folder, and choose 'Open command window here':

 This will open a command line window, but don't freak out. I'm going to tell you exactly what to type in.

First thing, we want to export the materials from both of our files, using the syntax "matedit.exe export [target obj.emm file] [newfile.txt]." So, in my case, I'm going to type (replace PSN/RYU and poison/ryu as appropriate for your files):
matedit.exe export PSN_01_01.obj.emm poison.txt
and
matedit.exe export RYU_01_01.obj.emm ryu.txt
If done correctly, you should have two new files in your directory, in my case, poison.txt and ryu.txt. At this point, we're done with the command line for now, but don't close it yet because we're going to need it again later.

For now, open both files in the text editor of your choice. Notepad works, but I prefer Notepad++ (it's free and awesome; go get it).

Open both of the txt files in your text editor. You'll see a series of sections which correspond to the various objects that make up the character's model. In each section, there are a bunch of variables and values that tell the game how to render each object. The ones we're worried about today are the MatCol variables:
 You'll notice that I highlighted just the *R, *G and *B MatCols, which correspond to the red, green and blue color channels, respectively, and not the *A MatCol, which corresponds to the Alpha channel. You shouldn't mess with the alpha value if you're just trying to change colors. ;)

So, lets say we want to take the color of Ryu's pants--i.e., white--and copy it over to Poison's hair. To do this, we would hop over to our ryu.txt file and search for 'pants.' Then, scroll down through his 'pants' section until we find the MatCol subsection.
 In this case, I only have a single color, MatCol0 to choose from, but some models will have multiple color groups, such as MatCol1 and MatCol2. These MatCols represent the color groups that can be customized in-game, so make sure you're choosing the correct one.

Copy those values and then switch over the poison.txt file and search for 'hair.' Scroll down to the MatCol section and replace the values there with your new, copied values:
 Great, we're almost done.

The last step is to import the modified text files back into the target *.obj.emm file. So, back to your command line window (if you didn't listen earlier and closed it, just open a new one) and type:
matedit.exe import poison.txt PSN_01_01.obj.emm
Now you're ready to test it out. Copy the PSN_01_01.obj.emm file into your [install directory]\resource\CMN\battle\chara\PSN folder, overwriting the one that was there (you made a backup, right??) and go check it out.

If you had calculated a new color from scratch using yajirobe's instructions instead of copying the color from some other costume, you would go through the exact same steps, only using your calculated color numbers instead of the ones from Ryu's pants.

That's it. Have fun, share your work and always make backups.

Analytics Tracking Footer